Office Manager Walkthrough
Read time: 16 mins 37 s
Table of Contents
As an office manager, you can manage call flows, users, phone numbers, and various permissions. This article provides a comprehensive overview of the “Office Manager” user type in the Client Portal, Powered by Net2phone.
Office Manager Views and Access
In this section, we will learn how to switch between Manage Organization, My Account, and Account Preferences views. Each view offers different access points:
Switch From "Manage Organization" to "My Account"
- Click your name in the top right corner.
- In the drop-down menu, click My Account.


Switch from “My Account” to “Manage Organization”
Click on Manage Organization in the top right corner.
Home

This section overviews the features available to you from the Home tab in the client portal. This tab gives you fast access to the most important and frequently viewed information.
There are four components of the Home section:
- Call Graph
- Current Active Calls
- Users and Applications
- Usage Stats
Call Graph
The call graph provides a fast way to view your company's data. You can easily adjust what information and what time period you want to view. Graphs can be generated by peak active calls, call volume, or total minutes. Additionally, graphs can be filtered by day, hour, and minute—for all calls or off-net calls.

You can also quickly zoom in on the current hour, day, or week.

Under the main graph is a smaller graph that allows you to slide the start and end dates/times to quickly fine-tune what data you want the main graph to display.
By day:

By week:

By hour:


Current Active Calls
The current active calls section lists all the currently active calls within the company, from the extension or caller ID, the name of the caller, the dialed number, the recipient, and the duration of the call. Sometimes refreshing the page is necessary for the client portal to register that a call has ended:
![]()

Users and Applications + Usage Stats
On the right side of the page, there are some figures and statistics pertinent to your company and its operations. The Users and Applications section lists ahead-count for users and devices while the Usage Statistics lists current stats, this month's stats, and last month's stats.


If there is ever a figure or a stat you want to know more about, all you have to do is hover over the information circle next to the name for a short description.

Call Center

The Call Center section is designed to give you fast access to the most important and frequently viewed information. There are five components of the Call Center section:
- Call Queues
- Active Call Graph
- Reports/Settings
- Stats Grid
- Agents
To see more on the Call Center tab, check out
Call Queues
The call queue section displays any queues associated with your call center. The number of active calls, caller waiting times, and idle agents' numbers are displayed here for each queue. From here, you can edit agents in each queue as well as the queue itself using the agent icon and edit icon buttons located on the right side. ![]()
There are 5 types of stats and graphs you can choose from:
- Queue Stats
- Agent Stats
- Agent Available
- Dialed Number Stats
- Abandoned
To access the different stat options, you must change the Stats report type and click the gear icon on the right side.

Queue Stats and Dialed Number Stats
The default stats included are:
- Name
- Domain
- Call Volume
- Calls Handled
- Average Talk Time (min)
- Average Hold Time (min)
- Abandoned Calls
- Service Level (%)
But you can choose to display any of the following: 
Agent Stats
The default stats included are:
- Call Volume
- Average Talk Time (min)
But you can choose to display any of the following: 
Agent Availability Stats
The default stats included are:
- Extension
- Department
- Logged in (LI)
- Available (AM)
- Lunch (L)
- Break (B)
- Meeting (M)
But you can choose to display any of the following: 
For Agent Stats, Dialed Number Stats, and Abandoned Stats, the table's information is compiled for all the queues in the account. If you want to focus the number on one specific queue, you can select which one from the drop-down, as shown below.
You can download or print any reports using the download and print icon buttons on the top right side.
Settings
Within the settings window, you can access two tabs, the Stats Grid tab, and the General tab.
The General Tab
This access point allows you to adjust your Service Level Agreement(SLA). Your SLA determines if a call is answered in an acceptable amount of time, measured in seconds. The default SLA is 60 seconds.
The Stats Grid Tab
This access tab allows you to choose which statistics will appear in your StatsGrid. If you choose to have a statistic displayed, you can enter the lower and upper thresholds to enable color warnings with green, yellow, and red.
- Green - The displayed statistics less than the lower threshold.
- Yellow - The displayed statistics are pointgreater than the lower threshold but less than the upper threshold.
- Red - The displayed statistic is greater than the upper threshold.
Threshold Numbers
If you choose not to enter a lower threshold, the warning color will turn yellow when 70% of the upper threshold is reached.
The statistic options you can preview in the Stats Grid are:
Callers waiting (CW) - the number of callers that are currently in the queue.
Average wait time (AWT) - the average duration a caller is waiting in the queue before it is answered or abandoned.
Average handle time (AHT)- the average time it takes agents to complete a call.
Service level (SL) - the percentage of calls meeting the configurable service level agreement.
Abandon rate (ABN) - the percentage of calls that went unanswered.
Calls answered (CA) - total calls answered.
Call volume (CV) - total calls that were dispatched to the queue.
Abandoned calls - total number of calls that went unanswered.

Stats Grid
The Stats Grid is located directly under the reports and settings buttons. If you want to filter stats based on specific queues, you can click the checkbox next to the queue name under the Call Queues section, as explained above in this article. If no queues are checked, the statistics show will be for all the call queues.

Agents
The Agents section quickly shows which users are or aren't available in queues if they are available (green), on a call (red) or not logged in (grey).
![]()
When hovering over an agent 2 buttons are available: ![]()
- Stats
- Queues
Stats
Individual agent statistics display here. This section displays data in three graphs: My Calls Per Day (for the last 10 days), my Calls Per Hour (for the last 24 hours), and Call by Organization Source(for the last 24 hours).

Queues
The queues section lists all the queues assigned to an agent. The information listed included the queue number, the description or name of the queue, the agent's current status for a queue, their wrap-up time, and the queue's priority to the agent.

Users

This section overviews the features available to you in the Users tab of your client portal. Office Managers have the ability to view and update other users' information.
Within the Users tab, you can easily access all of the people in your company on the client portal. Users display in this section by name, extension number, and department.

The default number of users displayed is 15. You can change the amount to 25, 50, or 100per page. Additionally, you can use the page number or arrow keys to scroll through pages.
![]()
By selecting HideSystem Users at the bottom of the screen, any auto-attendants, call queues, ring groups, etc. become hidden. Hide System Users are checked by default on your first login.
You can quickly find users by searching for them using their name or extension. By entering a department in the search box, you can filter users by their role in your company.

To view or edit a user’s profile, answering rules, voicemail, phones, and advanced you can click their name or the pencil icon.

Clicking on the pencil icon brings up a quick-access drop-down menu.

Alternatively, clicking on a user’s name opens a new view with the same access points, but in a tab bar.
![]()
If at any point you wish to navigate back to the main page of the Users tab, you can re-click Users in the main tab bar, or click Users next to the name of the user you are currently viewing.

Let's now go over each sub-tab.
Profile
Here you can modify the information of the user.


Answering Rules
Here you get access to the same Answering Rules tab a basic user sees when logged in to the client portal. It is presented in the same layout as the Answering Rules tab that we covered in the Basic UserWalkthrough course. You can make any changes on behalf of the user.

Voicemail
Get access to the settings tab each user sees when logged in to the client portal and looking at the Messages tab in Basic User view. You can make any changes to the settings on behalf of the user


Phones
Here you can see all the user's devices. The layout is the same as the Phones tab that we covered in the Basic User Walkthrough course.

Advanced
Here you can send a welcome email to the user for their first login as well as force a password reset.

Shared Contacts
You can create shared contacts that are visible to all users by clicking the Shared Contacts button beside the user search
![]()
Here you can search for contacts and you can add, edit and delete contacts.

All contacts created here will appear in the Contacts tab when looking at the Basic User or Call Center Agent views.
Auto Attendants

In this section, we will go over the Auto Attendants tab. Auto attendants sometimes referred to as “digital receptionists,” are pre-recorded voice menus that give callers transfer options. Utilizing an auto attendant system is cost-effective as it replaces or helps a human operator/receptionist by automating incoming call transfer procedures.
Creating Auto Attendants
To add an auto attendant, click the Add Attendant button and enter the name, extension, and time frame. While an Office Manager can technically use any available extension number, we recommend staying in the 8000 range to stay consistent with our standards. Office Managers are not able to delete auto attendants but they can contact Support to have them removed.
Auto Attendant Office Manager Overview
Auto attendant sometimes referred to as “digital receptionists,” are pre-record

Auto attendants, sometimes referred to as “digital receptionists,” are pre-recorded voice menus that give callers transfer options. Utilizing an auto attendant system is cost-effective as it replaces or helps a human operator/receptionist by automating incoming call transfer procedures.
|
NOTE: You must be in “Manage Organization” view to access the Auto Attendant tab. |
Creating Auto Attendants
During your onboarding process, a net2phone Canada agent will help you in the creation of auto attendants and your call flow. If you would like to add auto attendants, later on, you can do so in this section.
To add an auto attendant, click the Add Attendant button and enter the name, extension, and time frame.

Auto Attendant Number System
Auto Attendants should be part of the 8000 series. For example, your billing auto attendant could be 8001, and your customer service could be 8002. Never create an auto attendant with a pre-existing extension.
You cannot delete Auto Attendants.
Auto Attendant Iconography
 Edit a greeting or auto attendant message.
 Play a greeting or message.
 Manage audio files and greetings.
 Download a .wav audio file.
 Delete a greeting or message.
Managing your Auto Attendants
If your organization has an auto attendant or multiple auto-attendants, office managers can edit them in this section. You can edit the recording and the name of an auto attendant, but not the extension number.
To listen to an auto attendant greeting, you can click the play icon on the left.

To edit an auto attendant you can click the name of the attendant, or the pencil icon to bring up the edit pop-up menu.

Within the edit menu for an auto attendant, you have access to three sub-menus:
- Intro Greetings
- Menu Prompt (Manage Audio)
- Dial Pad Menu.

Intro Greetings
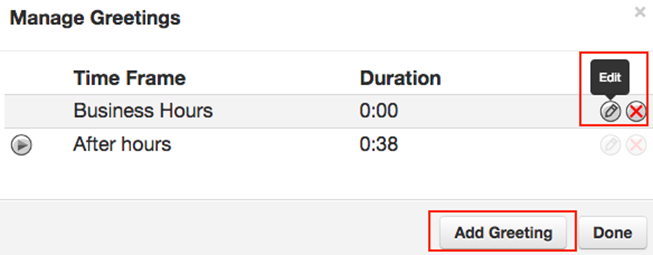
An introductory greeting plays before the auto-attendant message. Your introductory greeting will only be played once, even if you choose to have your auto attendant message(s) repeated. You may want to create multiple introductory greetings for one auto attendant, such as business hours, after hours, and holidays. You can access your introductory greetings by selecting an auto attendant and clicking the speaker icon next Intro Greeting.

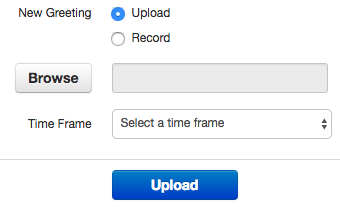
Within the Manage Greetings pop-up menu, you can directly edit, delete, and add introductory greetings. To add a new greeting, you have the option to either upload or record a greeting.
| NOTE: All intro greetings must be connected to a Time Frame. |
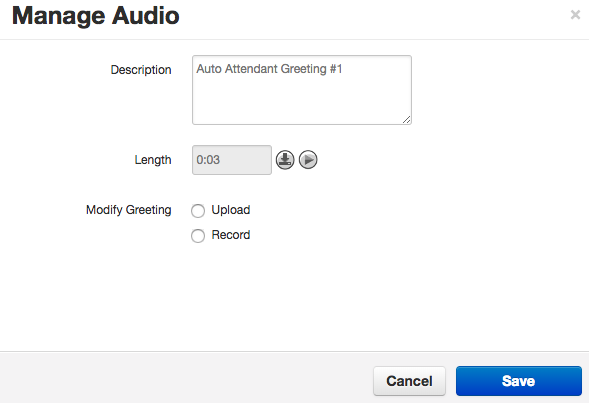
Menu Prompt (Manage Audio)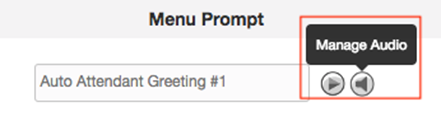
Under the Menu Prompt section, you can see the auto attendant name listed, a play icon, and a speaker icon. You can access the Manage Audio pop-up menu by clicking the speaker icon. Within the Manage Audio pop-up, you can edit the greeting description (i.e., name), see the length, and modify the greeting by uploading or recording a new auto attendant message.
Multiple Greetings, Only One AA Message
Unlike introductory greetings, you can only have one auto attendant message at a time. We recommend that you always download and save auto attendant messages before recording or uploading new ones, in case you wish to reuse an old auto attendant message.
Auto Attendant Options (Dialpad Menu) 
You can configure the auto-attendant options here. In the photograph above, there are no options open for use, as each one has an icon below. When you click a number that does not have an icon under it, you can choose what function that dial pad option performs.
Options

User – connects the call to a user’s extension.
Call Queue – connects the call to a call queue.
Directory – connects the call to a company directory. The prompt will ask the caller to dial the first three digits of the intended recipient's last name. If there are multiple employees with the same three numbers the prompt will ask the caller to press 1 for (first person), press 2 for (second person), and so on.
Voicemail – connects the call to a specific voicemail.
External Number – redirects the call to an external number.
Play Message – plays an additional message.
Repeat Prompt – repeats your auto attendant message.
Add Tier – plays an additional message with additional options.
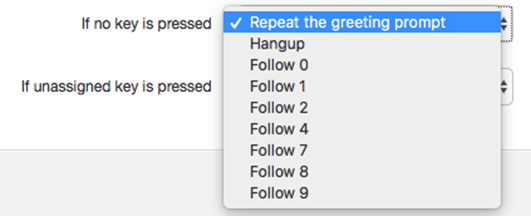
No Key and Unassigned Key Options
When auto attendants are in place, callers may accidentally press an unassigned key, or not press any key at all. To access your options for No Key and Unassigned Key, you can click the Options button, and a pop-up menu appears.

Here you can control what happens when no key is pressed or an unassigned key is pressed. The options are: repeat the greeting prompt, hang up, or follow one of the configured dial pad keys.
Warning!
Enable Dial by Extension is checked by default. It is important that this remain enabled as it denies the caller the ability to choose any auto attendant options when unchecked.

Call Queues Tab

In this section, we will cover the Call Queues tab. Call queues, sometimes called “ring groups,” are used for inbound call centers. Any call queues configured to an organization are listed here by name, extension number, type, number of callers currently in the queue, and available agents.
Creating Call Queues
To add a call queue, click the Add Call Queue button and enter the name, extension, and call queue type. While any available extension number can be used for call queues, it is recommended to keep them in the 8800 range to maintain our standard. As for Call Park queues, they must be between the range of 8851 and 8859 to work as expected.

To delete a call queue, click the red X of the call queue row. Be mindful—you can not undo this action.

Call Queues Types
There are five types of call queues:
Round-robin– routes callers to the available agent that has been idle the longest.
Ring All – routes callers to all available agents at the same time.
LinearHunt – routes callers to the available agents in a predefined order. The order is defined when editing the queue’s agents.
LinearCascade – routes callers to groups of available agents in a predefined order. The order is defined when editing the queue’s agents.
Call Park – places the caller on hold until an agent retrieves them. Only Basic editing options are available for this type of call queue

Queue Options
There are four option sections when editing a queue:
Basic – edit call queue name, type, direct phone number(s), and statistical reporting.
Pre Queue Options –options for what happens to the call before being put in the queue.
In Queue Options –options for when callers are queued and waiting to be routed to agents.
QueueAgents – edit additional features that are specific to individual agents in a call queue.
NOTE: All options except queue agents can be accessed by clicking the call queue name. To access the edit agent window, you must click the agent icon. ![]()
Basic Options
Basic options are the same regardless of what call queue type you have chosen. You can change the name of a call queue, but not the extension number.
Name– the name of the queue.
Extension– the extension of the queue.
Type– choose between five call queue types.
Direct Phone Number(s) – displays all phone numbers associated with the call queue.
Statistics – choose if you want to collect statistics for a call queue.

PRE QUEUE OPTIONS
Require Agents –whether or not at least one agent is required to be online before sending a caller to the queue.
Require intro MOH –whether or not the music-on-hold plays in full and does not attempt to reach any agents until the song/greeting is complete.
Max Expected Wait – the maximum expected wait time (in seconds) before the queue is unavailable to new callers. This applies when the queue’s average wait time reaches the maximum expected wait time.
Max Queue Length – the maximum amount of callers allowed in the queue before it’s full and unavailable new callers.
Forward if unavailable – enter an extension or phone number where callers are forwarded to if the queue has reached its expected max wait or the queue is full.

In Queue Options
The In Queue Options section will offer slightly different configuration options as the flow of each queue type differ.
Queue Ring Timeout – how long the queue attempts to ring agents before following an exit option.
Agent Ring Timeout – how long the queue rings an agent before moving on to the next available agent. This should be less than the queue ring timeout.
Initial Agent Group Ring (only linear cascade) – the first group of agent rings based on a predefined order. All agents with the chosen order number and lower will ring. For example, if you choose 5 for this option, all agents with Order 5 or lower will ring.
Agent Group to Add After Timeout(only linear cascade) – this adds an additional group of agents to ring when the agent ring timeout for the first group is reached. The queue rings the first group of agents and then the added agents with the chosen order or lower simultaneously.
Logout Agent on Missed Call– if an agent misses a call, you can choose to log them out of a queue.
Forward if Unanswered – enter an extension or phone number to forward callers to in case agents fail to answer before the queue ring timeout.
Voicemail– callers are given the option to leave a voicemail if agents fail to answer before the queue ring timeout and Forward if Unanswered is not set.

Agent Options
The edit agent options are accessed by clicking the agent icon in the call queue rather than by clicking the call queue name.

- Agent Phone –displays in the agent extension or name.
- Status – mark the agent as online or offline.
- Wrap-up time – the amount of time (in seconds) after a call ends and the agent is prompted to take another call.
- Max Simultaneous Calls – the maximum amount of active calls an agent may receive at the same time.
- Queue Priority for an Agent– this specifies the queue priority to a specific agent if they are assigned to multiple queues.
- Request Confirmation – similar to SmartAnswer, this will prompt a user to either press 1 to accept a call or hang up to reject a call.
- Auto Answer – automatically answers a call for an agent.

When editing agents from a specific call queue, a list of all users within the call queue is listed below the agent you are currently editing. In this section, you can see:
- the agent name,
- phone number/extension,
- if they have auto-answer enabled or not,
- their wrap-up time, and,
- the max amount of calls they have at one time.
In the bottom right corner of this pop-up menu, you can add an agent by clicking the Add Agent button.

Time Frames

You can locate the Time Frames section in the tab bar of your client portal. Times frames allow you to choose what happens based on a date range, or a time. There are three types of TimeFrames you can choose from in addition to your default Time Frame:
- Always
- Days of the week and times
- Specific dates and ranges
NOTE: It is important to remember that once a Time Frame is created, you cannot edit the name. Aim to name your time Frames, so they are easily recognizable when you are creating answering rules.
The Default Timeframe
The default Time Frame becomes active whenever you do not have a Time Frame currently in place. For example, if you set a work-week Time Frame to be 9:00 a.m. to 5:00 p.m. from Monday to Friday, your default Time Frame becomes active during the week from 5:01 p.m.to 8:59 a.m. the next day, and all day during the weekend.
Always
This Time Frame includes all times of every day. This option is ideal if you need an answering rule turned on/off at irregular times. For example, if you don’t have set lunch hours.

Days of the Week and Times
This Time Frame allows you to select the days of the week, as well as the start and end time per day. The blue bars indicate the active period, and whatever is not in blue is considered your default Time Frame. The screenshot below demonstrates the average office worker's work hours.

Specific Dates and Ranges
This Time Frame allows you to select specific dates or a date range, including by-the-hour or even by-the-minute ranges. If you want a time range within one day, select the same period for both calendar fields.

Notes for All Users
- There are two types of TimeFrames, shared and private, which are identified in the Owner column.
- Basic users can not edit shared Time Frames.
- Private Time Frames are personalized Time Frames created by an individual user and linked only to the user’s extension number.
- Private Time Frames are only visible to the user who created them.

NOTES FOR OFFICE MANAGERS AND CALL CENTER SUPERVISORS
Office managers and call center supervisors have to be in “My Account” view to access their personal Time Frames list.
Office managers are the only users that can create shared Time Frames. Shared Time Frames automatically become visible for all users in your organization.
Music On Hold Tab

Let's now move on to the Music on Hold tab. This is the place you come to upload music on hold for the organization, specific users, and queues.
Default Music on Hold
If you don't upload music on hold here, the system default music will play when callers wait in a queue or when they are put on hold by users.

If a file is uploaded here, it will override the system default for all users and queues.
Music on Hold for Specific Users
If you want to upload music on hold for a specific user or queue, you must first search for it.
NOTE: If you have a file uploaded for the account as well as a different file uploaded for a specific user or queue, the latter will be the one used.

Once, selected the gray bar will reflect which user/queue you are looking at.

Any files uploaded here will only apply to the user in question.
Add Music on Hold
- Click the Music On Hold tab.
-
Click Add Music.

- Click Browse and select the .wav or .mp3 file you want to upload.
- Name MOH next to "Song Name" so you can recognize it in the future. Click Upload to save.

Managing Music on Hold
Once you have one or more files uploaded, you can:
- Reorder them by dragging the arrow icons

- Play the music files

- Download a copy

- Edit the name

- Delete


Settings

In the settings window, you can enable/disable the Music on Hold feature. You can also randomize the music. If randomize is off and you have multiple files uploaded, they will play in sequence if someone is holding long enough. Finally, you can record or upload an intro greeting. This is especially useful for queues as the intro will only play once before starting to play the rest of the music which will loop if holding long enough without ever replaying the intro.

Phone Numbers

In this section, we are going to cover the Phone Numbers tab.
The Phone Numbers tab lists all phone numbers configured fo your organization. For each phone number listed, the treatment, destination, and any notes will be displayed.

A .csv file of all phone numbers can be exported by clicking the Export button. ![]()
You can click the pencil icon to edit a phone number. Phone numbers can be edited by available number, user, conference, call queue, voicemail, and auto attendant.

Available Number – is used when a phone number belongs to your company but is not currently assigned to a person or phone. Available numbers are held on your account for future use.
User – the phone number will be routed directly to a user or extension in the organization.
Conference – the phone number will be routed directly to a conference bridge(if applicable).
Call Queue – the phone number will be routed directly to a call queue (if applicable). You have options to configure how the caller will be introduced to the call queue: with no announcement, by announcing the number of callers in the queue, or by announcing the average expected wait time.
If your organization has specific answering rules for a call queue, the treatment should be “User” with the “Call Queue” name/extension selected, as depicted in the picture below. If the “Call Queue” is selected the treatment will bypass any answering rules in place and send the inbound caller straight to the queue.
Voicemail – the phone number will be routed directly to the voicemail of a user’s phone number or extension.
Auto-Attendant – the phone number will be routed directly to an auto-attendant.
If the organization has specific answering rules for an auto-attendant, the treatment should be “User” with the “Auto-Attendant” name/extension selected, as depicted in the picture below. If the “Auto-Attendant” is selected as the treatment, it will bypass any answering rules in place.
Call History

Let's now go over the Call History tab. While all users have access to their individual call history, only Office Managers can access the company's call history.
View Company Call History
The call history list contains the following information:
- call type
- number of the caller
- name of the caller
- date
- time the call occurred
- duration of the call
The default number of calls displayed is 15, but you have the option to set the calls-per-page to 25, 50, or 100. You can navigate through pages by either clicking the page numbers at the bottom or scrolling through pages using the arrow buttons.

![]()
Call History Iconography
● ![]() Incoming Calls
Incoming Calls
● ![]() Outbound Calls
Outbound Calls
● ![]() MissedCalls
MissedCalls
Call History Filters
Using filters saves time tracking, searching, and managing your call history. Any filter in use is displayed next to the Filters button.
![]()

- The date range (From-To) – refine your search by entering a specific time range using the “from” and“to” calendars. The maximum range is 16 days.
- User – refine your search by entering a specific user’s name or extension.
- Caller number – refine your search by entering a specific caller’s number.
- Dialed number– refine your search by entering a specific outbound number.
- Call type – refine your search by selecting call types: inbound, outbound, missed, ext to ext (internal calls), and off-net (external calls).

Exporting Call History
You can export calls through two methods, Export, and ExportBilled Calls.

Export – This report shows the call date, call time, outbound name, outbound phone number or extension, dialed number or extension, and where the call was made to. You can export call history as a .csv by clicking the Export button.
Export Billed Calls – As an office manager, you can see the organization’s usage. This report shows the user, domain, call type, the origin (incoming phone number), the destination (i.e., what number the originating number dialed to reach that user), time/date started, and cost. You can export billed call history as a .csv file by clicking on the Export Billed Calls button.

Hotkey Builder
Learn more about customizing your Line Key Options in the Hotkey Builder section.